By now you’ve already seen my kitchen floor. Especially if you follow my
I’ve done
the process before in our ONLY Bathroom, about 3 years ago. You can click that link to see how I did it the last time—OVER VINYL. The space, in my kitchen, is about 6 times the area—so we exhausted most of our materials. The technique is pretty much the same. I’m going to show what I did different this time and how it worked out for me.
1.
Find a Chump-Enlist a Helper OR willing participant… ;)

2.Measure paper for strips--
was put there to keep the paper from tearing when we cut it. The CHUMP Helper… taught me that! Ssshhh…! don’t tell him I said that. ;)
3. Cut paper with a chop saw—on the tape with measurements. Nice and easy—don’t hurry.
We had very little fray. Turned out pretty nice! FIVE- 7 inch rolls, ready to go! We used
** Please use caution with saw. Follow the manufacturer’s instructions. Wear protective gear. Eye and Ear protection, etc. Notice I edited my photos… lets assume we follow our own advice, okay?
4. Prepare your floor.
I Vacuumed, swept, Vacuumed again… damp mop to remove any dust. I had to use Vinegar and good old fashioned elbow grease, around the stove to remove the oil.
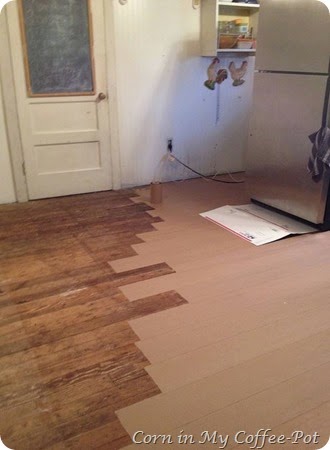
5. I used Elmer’s Wood Glue, why Wood glue and not All PURPOSE? The bottom line AGAIN! COST! This time we used a roller and rolled it onto the floor and onto the back of the paper and of course after putting the paper down, we rolled it with glue to seal. That’s 1-2-3 applications of glue. Be thorough. Oh, I also used a 1:1 ration of glue thinned with water; and mixed in a bucket (equal parts)
**NOTE: This picture was right after we started and shows glue on the 3rd application—after the paper was down—something was amiss. I had to stop—scrape the floor and give it an extra scrubbing—and we also had to thin the glue a little more. It was too thick.
Chump rolling glue!
Me, hard at work laying out the paper strips.
I implied before that there would be an over lap. There was and it was about 1/2 inch on both sides. REALLY, I EYE-BALLED IT. The floor covered really well. The paper was thin enough to allow some of the imperfections to come through the paper—and it helped to give the appearance of real wood.
Because the temps were so nice of GLUING DAY- I took it slow and easy, and well, time got away from me, I could have probably done the entire floor but instead I only did half on Saturday and the other half on Sunday.
BUT FIRST! THIS HAPPENED. …Saturday afternoon Momma dog, that lives in or around the old abandoned house nextdoor, came over and dropped off some things, while grabbing a snack on the front porch. She is a ‘scardy-dog’ and won’t stick around. But she left these little pups. (there are NOW 7 a week later)

…BACK TO THE FLOOR- Sunday.
6. Create Faux Wood Characteristics: Realizing my miscalculation of time and weather—as soon as it was dried I got busy and creative with ‘wood look details’
I did NOT get any pictures of this technique, except after—but it’s basically a 3 inch roller between my fingers and I would brush the paint on – and DRAG it where I wanted the black paint. You can see a tutorial on this method
here. In this condition, it looks like something you’d see at SIX FLAGS in the Old West part of the park! I also used the Scratch Repair Markers to make lines and create some knot holes. I really just went wild with it! That part was fun. What was even more fun, was seeing the Honey’s face when I started this process. He truly thought I was messing up all the hard paper work.
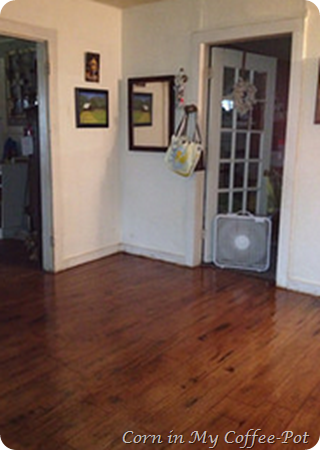
7. Stain- I brushed it on and left the stain on it— and let it dry! I took pictures of the stain on the floor BEFORE POLY… but they all look alike. I know this is stain only not poly—because of the socks.

** another NOTE: If I do this again—I will try a stain and poly combination/mixRather that 2 separate applications and dry times. MINWAX makes some, if you’ve tried let me know how it worked for you, if you liked it, etc.
Ok-
8. Polyurethane Application—BRUSH ON! 2 COATS are needed for a good seal. ...but by this point, it had gotten really REALLY cold, the pilots were blown out on the cook stove, no FIRE could be built in the wood stove, the fans were blowing and the kitchen window (on the NORTH side of the house) was opened up. I even unplugged the fridge so the compressor wouldn’t kick and ignite the flames due to fumes.
Honey wanted to roll it, but it made bubbles in the poly. Thankfully, it was just a small area, and it was where the fridge sits. I let it dry while I started on the rest of the
room. It took 24 hours to dry—it doesn’t in normal temperatures; check the weather
for warm days. ** When warm days come apply second coat. ;)
… and make sure you have proper ventilation.
Ups and Downs--
UPs::
- Cutting the paper with the saw went way faster was easier on the hands/ arthritis.
- Rolling the Glue, rather than brushing each piece and the floor twice, was also a time saver and a KNEE SAVER.
- ENLISTING A SECOND PERSON—PRICELESS!
DOWNS::
- TIMING: NOT USING TIME WISELY- work, work, work until it’s done, you never know when Weather or puppies might T-bone the schedule and create delays.
- TIMING: PLAN TO HAVE no visitors and the kids go to Gramma’s or at school, etc-- (it helped that we did NOT HAVE OUR LITTLES the last week in December)
- TIMING: BE REALISTIC- I planned on it taking 5 days; thinking it would really only take 3 1/2... IT took 5. (Saturday- Wednesday)
** my downs are HUMAN ERROR. Not really having anything to do with the project
directly.
If you’re still reading this far! WOW! and THANK YOU!
If you’ve done something similar—let me know, so I can visit your blog and read about your technique and experience.
If you have questions, feel free to contact me via email or leave a comment I’d be more
than happy to answer any questions if I can.